How to grow mushrooms in 5-gallon bucket?
Mushrooms bring a savory flavor to meals without adding much fat, sodium or calories. They can even help keep your brain healthy. A research report about 17 cancer studies reveals that eating just 18 grams of mushrooms per day may lower your risk of cancer by as much as 45%. Growing mushrooms in a 5-gallon bucket is a great way for beginners to get started. This article provides complete information about how to grow mushrooms in 5-gallon buckets at home.

Why to grow mushrooms in a 5-gallon bucket?
- Growing mushrooms in a 5-gallon bucket is an affordable and easy way to produce delicious healthy mushrooms
- Growing mushrooms in a bucket is a great eco-friendly way because the bucket can be used hundreds of times.
- It requires no special skill or past experience.
- It doesn’t require any specialized and expensive equipment to grow mushrooms in containers.
- It is the best way to have small-scale mushroom production with minimal effort and cost.
- You just need a small spare room or a basement.
Which varieties of Mushrooms are best for growing in a 5-gallon bucket?
Many species of mushrooms can be grown in a 5-gallon container at home. These are
- Oyster mushroom
- White Button mushroom
- Shiitake mushroom
Out of these, Oyster mushrooms are the most preferable choice for bucket growing; they grow on a vast variety of substrates; they also grow fast and are less prone to contamination than the other two specie.
Material Requirements to Grow Mushrooms in 5-gallon bucket:
- A plastic 5-gallon bucket (20 liters) with a lid
- Grain spawn (1 to 2.5kg)
- Substrate material
- A drilling machine
- A micropore tape
- Hydrated lime
- A netted bag
- pH meter
- Large container for water
Steps to cultivate mushrooms in a bucket
Step1: Choosing the type of mushroom you want to grow
- First of all, decide what type of mushroom you want to grow. All these three types of mushrooms (Oyster, White Button, or Shiitake mushroom) are easy to grow in buckets, but all these species have different nutritional needs.
- Selecting the specie of mushroom is just a matter of taste. You choose the type which you often like to eat. In this article, we will be focusing on growing Oyster mushrooms.
Step 2: Gather all requirements and materials
- 5-gallon bucket (20 liters) of plastic with a lid:
Either buy a new bucket or use the available bucket you already have. In the case of 2nd hand bucket, make sure it has never been used for harmful chemicals. If you are still not sure, buy a new clean bucket.
- Mushroom spawn:
In this article, we use grain spawn of mushrooms which is available easily in the market. You can also purchase it from Amazon or eBay. Grain spawn yields higher production than sawdust spawn. You will need 1-2.5kg grain spawn for each 5-gallon (20 liters) bucket. This rate is 5 to 10 percent in a 5-gallon bucket. After gaining a little experience, you may grow your spawn. You can also take help from our article “How to grow your mushroom spawn in pots/containers”
- Substrate material:
Shredded straw or properly chopped sugarcane bagasse is used as substrate. You can also buy a bale of straw and chop it in pieces (less than 5cm in length). It will enable good air exchange; however, the bucket will be tightly filled with substrate.
- A drilling machine:
A drilling machine of 12mm is required to make holes in the bucket.
- Micropore tape:
It is a glue-like paper tape, usually available in pharmacies for wound covering. Here, it will cover the holes in the bucket. This tape will keep the soil moist but also allows air exchange.
- Hydrated Lime:
It is also known as Calcium Hydroxide, available in hardware stores easily. The quantity of the Hydrated Lime will be not more than 6 percent; otherwise, it will affect the growth of the mushroom.
- A pH meter
Better to have a pH meter for checking the sample of hydrated lime water, but it is optional.
- A netted bag:
A netted bag will hold the substrate while in the water, but it is optional.
- A container for holding water.
A container will hold water for soaking during pasteurization which should be big enough.
- Rubber gloves and face mask:
Use these for your protection while dealing with Hydrated Lime.
Step 3: Prepare your bucket
- First of all, drill holes all around the bucket using a drilling machine for ventilation and fruiting. The holes should be 10-15cm apart. You can also create a few smaller holes in the bucket’s base to allow the excess water to drain.
Step 4: Pasteurize the substrate
- Pasteurization is a method to permit good bacteria to remain in the substrate and reduce the number of microscopic toxins before adding grain spawn.
- There are two pasteurization techniques of substrate: hot water and cold water bath pasteurization.
- In this article, we have discussed our favorite technique, cold water lime bath pasteurization. If you want to try other pasteurization techniques, read out this post: “How to Pasteurize Mushroom Substrate in three ways”
- Cold water lime bath pasteurization includes soaking the substrate in hydrated lime water for 24 hours. Water’s pH level increases with the hydrated lime, killing contaminants.
- Here is the complete process of cold water lime bath pasteurization:
- Fill your shredded straw into the netted bag.Now pour water in a container up to 60 percent.Add 2 grams (0.2%) of hydrated lime to every 1 liter of water and stir well.Take a sample of hydrated lime water and test it for pH level. The desirable level is between 11 and 13.Now you can dip the netted bag of straw in lime water. You may notice that the bag tends to float. To completely submerge into the lime water, push down the bag in the bucket with a heavy object.Keep the bag in lime water for 24 hours to hydrate and pasteurize.Now hang the bag somewhere to drain for at least 1 hour. If you are in a hurry, you may take all the substrate from the bag and scatter it on a clean surface.
- Squash the substrate in your hand. If more than a few drops of water come, it needs to drain a bit longer.
Step 5: Fill the bucket with grain spawn and the bulk substrate
- Once your substrate drains completely, the next step is to fill the bucket like a layered cake.
- Before filling the bucket, make sure to cover the side holes of the bucket with micropore tape.
- Start with the pasteurized straw at the bottom of the bucket, then add a layer of grain spawn and then again more substrate.
- Continue with this layering process until you get to the top of the bucket. The last layer should be the layer of straw.
- Cover the bucket with its lid. Write the date, type of mushroom, and substrate type on a label and paste it on the bucket. It will help you improve your further experiments and production skill in growing mushrooms.
Step 6: Place the buckets in a dark warm place
- Before producing fruit, the mycelia in your mushroom need to spread into the substrate completely. This process is called Mushroom Colonization.
- At this stage, a warm environment encourages its growth. Leave the bucket in a warm dark place where the temperature is around 65-75 F (20-24 C).
- At this temperature, mycelia will take two weeks to colonize the substrate completely.
- After a week, you should open the lid. You will observe white cottony patches on the substrate.
- Around after three weeks, the mycelium will push off the micropore tape at the holes and start to fruit.
Step 7: Production of mushrooms
- After colonization, when the mycelium gets short of its food (substrate), they start producing mushrooms for survival.
- Production of mushrooms is affected by the specie of mushrooms, temperature, quantity, and quality of spawn used.
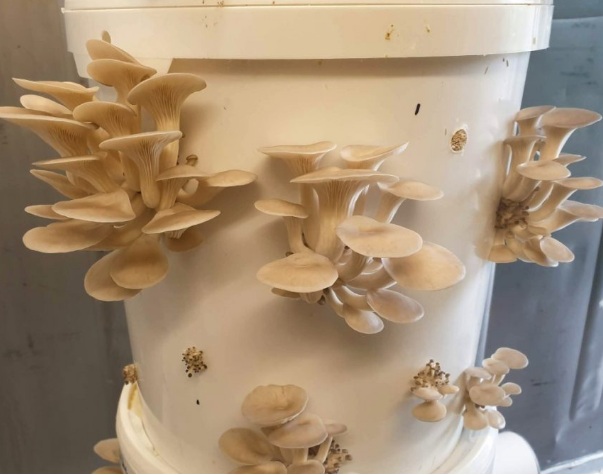
Step 9: Harvest the bucket-grown mushroom
- After three weeks, you will notice small mushrooms appearing from the bucket holes. Keep them growing by providing a moist, cool, and dark environment.
- When the caps of your grown mushrooms are fully separated from their stems and flattened out; it is the best time to harvest before their caps begin to curl upwards and drop all their spores.
- Just pluck out the mushroom at the base close to the bucket and twist them.
- Determining the harvesting time is not always easy for a beginner gardener. When you see that your Oyster mushrooms start dropping a lot of spores, it’s the best time to harvest.
Where to store freshly harvested mushrooms?
- Wrap the freshly harvested mushrooms in paper and refrigerate them for up to a week.